A Low-Cost DIY Mic upgrade

A Low-Cost Beginner’s Mic
Saturday, October 20, 2018

Here’s a mic which you can build for very little money, yet performs well, is quiet, and neutral in sound. It is suitable for recording almost anything. Sure, given a closet full of mics, you could pick a mic which suits a particular voice or guitar better, but this will give a natural un-hyped rendition of any thing you put in front of it. It requires a minimum of hacking and soldering.
The starting point is a BM-700 or BM-800 cheap electret mic from eBay, Amazon, or wherever. This morning, prices run from $11 to $30+ apiece, so shop around. Update 2022: many of these cheap mics now have different circuit boards inside. Some are similar to these early ones, and some are stripped down and can’t be used for more than the metal body parts. See following blog entries.
The small capsule is replaced with a 1” (25.5mm) electret capsule such as the Transound TSB-2555B
http://www.jlielectronics.com/microphone-capsules/tsb-2555bxz3-gp/
https://microphone-parts.com/collections/capsules/products/tsb-2555b-microphone-capsule
Other mic builders have reported good results with other 25mm “blue backed” electrets, so those are alternatives if you have trouble finding JLI / Transound capsules in your part of the world.
Here’s a low-cost mic with studio grade performance. The character is neutral, suited to most kinds of recording. The kind of mic I’d have loved to have when I started out.
The existing electronics are modified to suit the capsule and to eliminate background hiss. This requires a small NPO ceramic or mica capacitor of 20 to 30 pF, an electrolytic capacitor of 250 to 1000 mF at 16V or more, (Make sure it’s small enough to fit inside the mic.) and optionally but recommended, a 270 to 470 ohm, 1/8 watt or higher, resistor.

Soldering is required. If you aren’t experienced with a soldering iron, enlist a friend who is. The capacitors attach to existing pads on the printed circuit. The optional resistor requires cutting a trace and soldering. None of the parts are critical values, anything close from your parts stash should work. I used 22pF, 1000mF / 16V, and 330 ohms 1/4 watt.
So let’s get to it! First task is to mount the new capsule. We have to cut the small capsule holder.


The new capsule is glued to the holder with urethane or epoxy glue. Set it aside for the glue to dry while we work on the electronics.

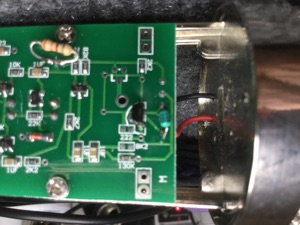
Your electronics should look like this, universal in cheap Chinese mics:


Notice these two pads. The small ceramic cap connects here

The large electrolytic filter cap + connects to this pad and -- to ground.
The new capsule connects to the existing wires.

The optional resistor will reduce low frequency noise from the voltage regulator. This is trickier to solder than the capacitors.


Skip it if you’re new to soldering. Cut the trace here and scrape off the green solder mask. Solder the resistor across the cut trace.


Finished printed circuit, both sides.
The last change is to swap the wires at the output going to pin 2 & 3 of the XLR connector. All of these mics I’ve looked at have phase reversed from studio standard. Check your mics.
A finished pair of modified BM-800s next to a couple of more familiar mics.
These sound like other mics using this capsule, like Alex and Homero’s “Alice” mics, but without scratch-built electronics.


Solder the ceramic cap here.


